If you’ve worked with commercial printers then, chances are, you’ve heard the term “bleed”. Perhaps you already know everything there is to know about it, or perhaps you’ve dismissed it as technical jargon for the Graphic Designers to worry about, but from a printer’s perspective, “missing bleed” is one of the most common issues that we face. But what is bleed? Why is so important?
In printing terms, a bleed is where the printed design goes all the way to one or more edges of your finished document. To create a printed piece with a bleed, the original artwork must extend beyond the document trim size. This is usually by a margin of around 3mm on each side of your document, but you should always check with your printer before sending your artwork as they may have a slightly different setup which requires more bleed or less bleed.
Why is bleed important?
By extending your artwork past the final required trim size, you essentially eliminate the possibility of there being a thin strip of unprinted paper along the edge of your document. This can occur if you don’t allow for bleed and the paper might shift ever so slightly whilst it’s being trimmed at the Printers. Most printers will specify a trim margin of error which is typically around 1mm. You may think 1mm isn’t much at all but when you get your business card back you’ve perhaps got a full block of colour on your design, you WILL notice that 1mm of white stripe down the edge.
Below is an example of the same artwork with bleed and without bleed:
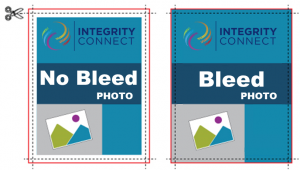
Should the one with no bleed be sent off for printing and the paper shifts during the trimming process, then you may end up with that thin white line down one edge. However, by having a 3mm bleed margin, you negate the possibility of ending up with that white line along the edge of your document, even if the paper does shift during the trimming process.
How do I add bleed to my document?
Using Adobe® software (a favourite with Graphic Designers), there are straight-forward steps to help you add bleed to your artwork.
Adobe® Photoshop®
- Open Photoshop and click File > New…
- Enter the FULL BLEED dimensions. That is, 1/4″ extra both vertically and horizontally.
- Set the Resolution at 300 pixels/inch
- Set the Color Mode to CMYK
Adobe® Illustrator
- Open Illustrator and click File > New…
- Enter the TRIM dimensions in the Width and Height boxes (for example, the trim dimension on a standard business card would be 3.5″ x 2″)
- Enter 0.125 for the top, bottom, left and right bleed
- Set the Colour Mode to CMYK
- Set the Raster Effects at High (300ppi)
Adobe® InDesign®
- Open InDesign and click File > New > Document…
- Enter the TRIM dimensions under Page Size (for example, a standard business card would have trim dimensions of 3.5″ x 2″)
- If you do not see “Bleed and Slug” at the bottom of the window, click the “More Options” button.
- Enter 0.125 for the top, bottom, left and right bleed
More in-depth Graphic design tutorials are readily available through the developer’s website. If you’re still unsure about adding bleed to your artwork, your commercial printer should be able to give all the guidance you need.
Finishing Marks
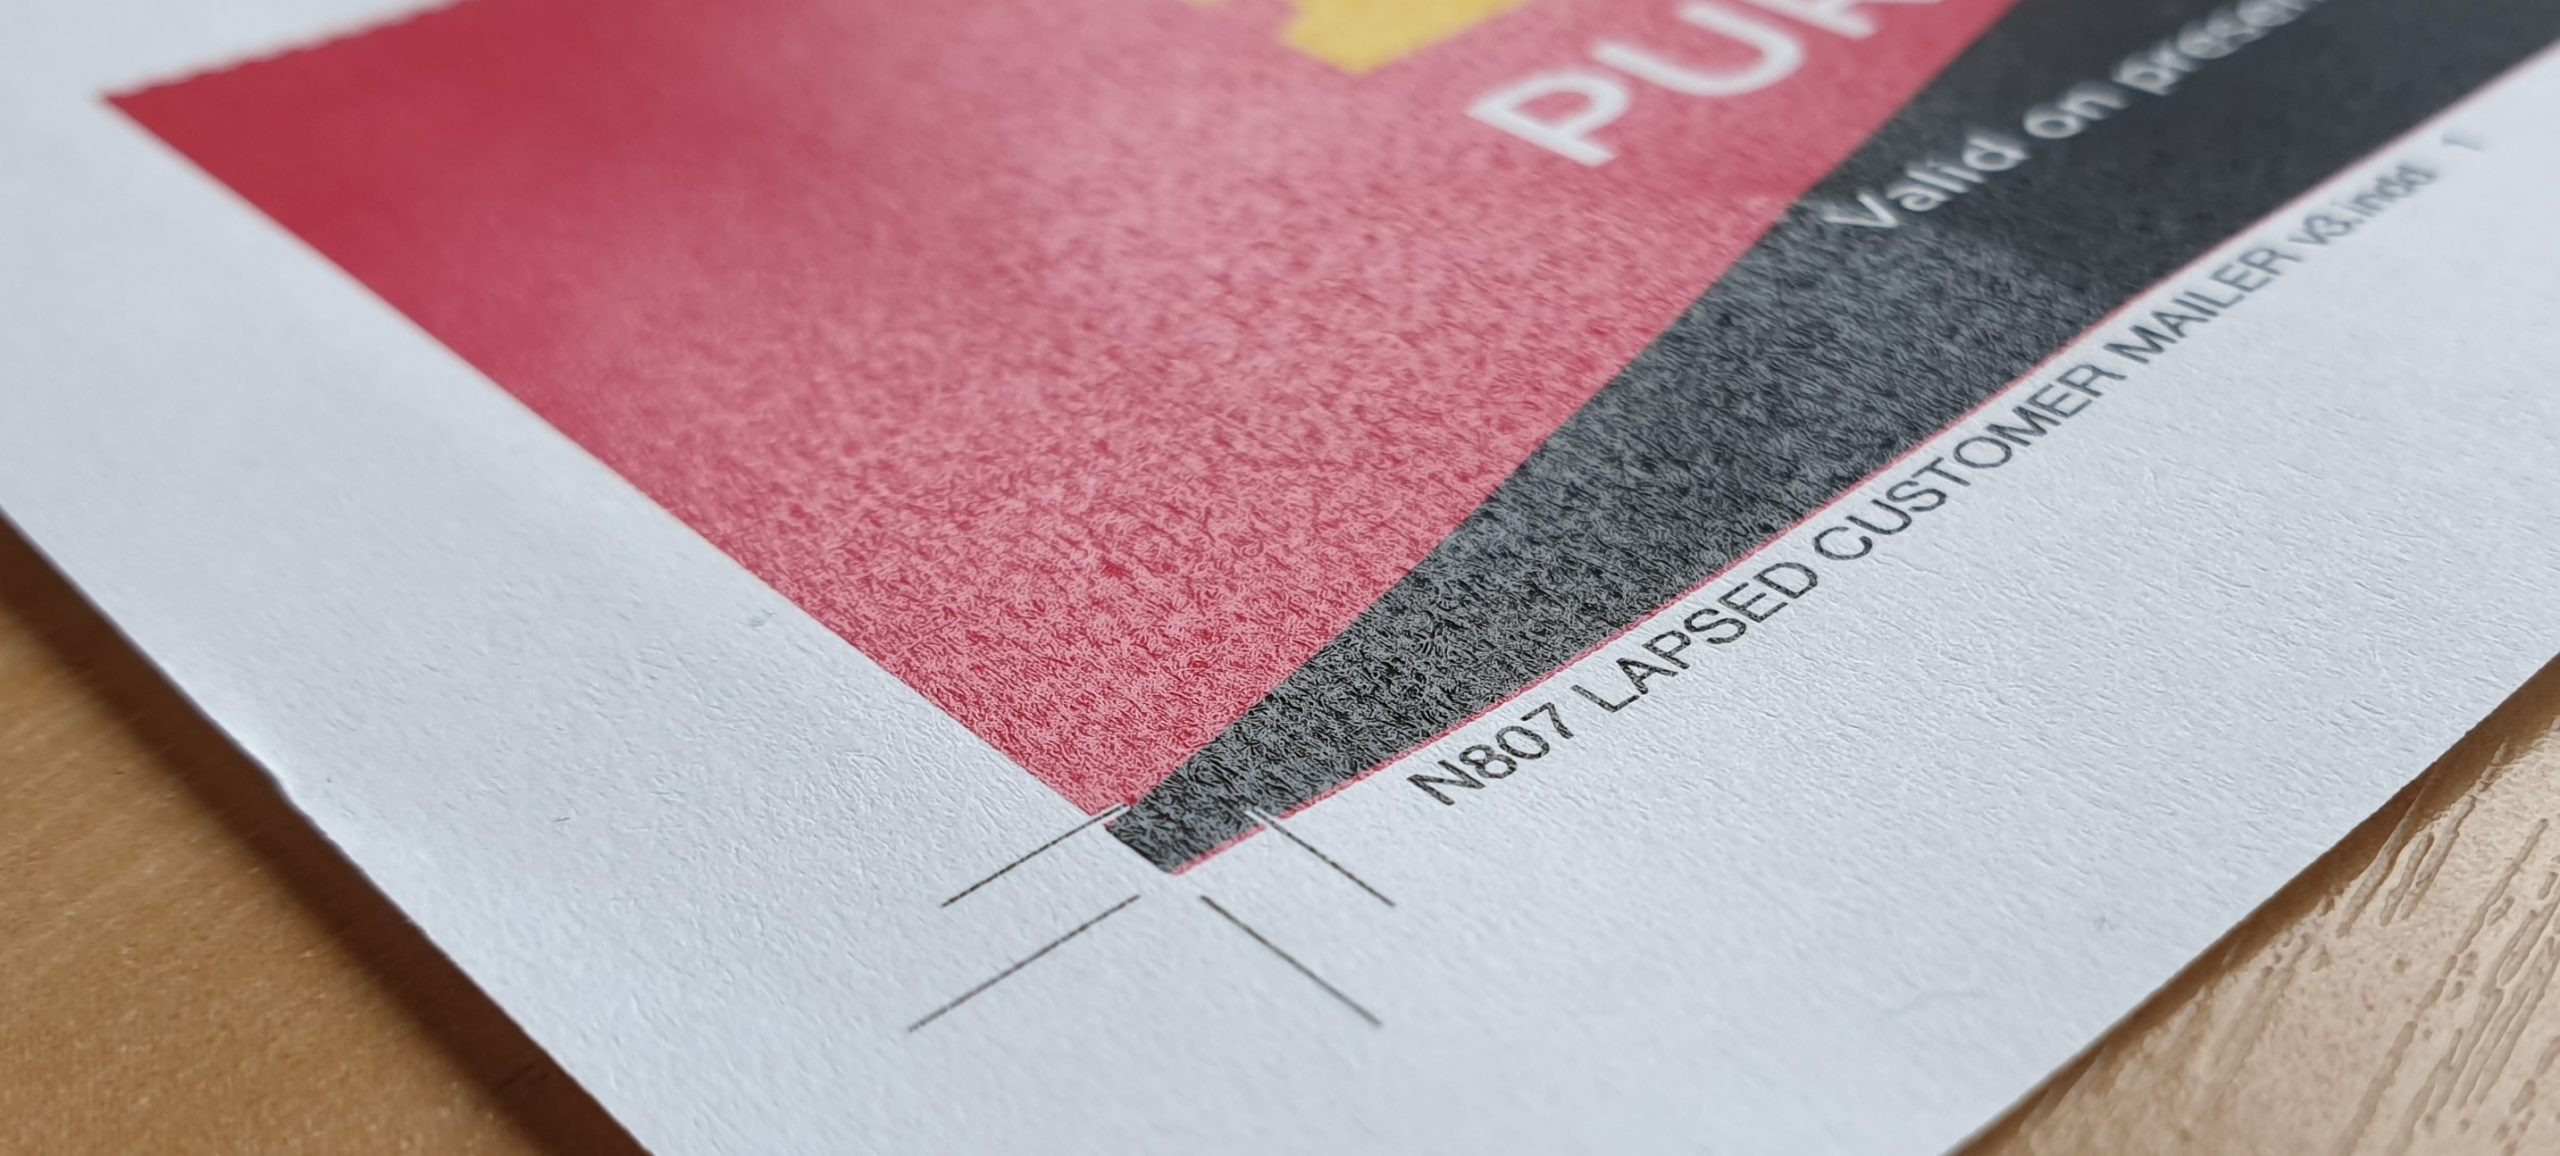
As well as bleed, there are other quality control mechanisms that printers use to ensure your document is printed exactly as intended. Added at the design stage, finishing marks (also known as printer’s marks) are used to guide and inform the printer. Finishing Marks include bleed marks, trim marks, registration marks, and colour/grey tint proofing bars.
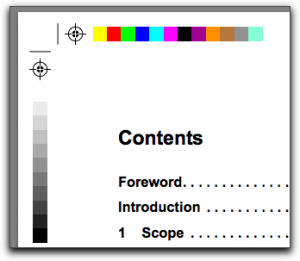
- Trim marks – (a.k.a crop marks) are lines placed at the corners of an image or a page to indicate where to trim (cut) it. PDF Nomad 2 combines the trim marks with fold marks, that indicate where the paper is to be folded. Whereas the trim marks appear as solid lines, the fold marks appear as dashed lines
- Bleed marks – are similar lines around the corners of printed material used to indicate the areas that are printed over the cutting edge (indicated by the trim marks)
- Registration marks – are crosshair lines with a circle that guide graphics equipment and personnel in processing printed material during the printing and finishing process.
- Proofing bars – are used by printers to ensure consistency and quality in printed output
So . . .
In a nutshell, if you want your printed design to go all the way to the edge of your paper, you must always include bleed in your document artwork.
The Integrity Solution
Our team of experts are market leaders when it comes to all things print. Our Pre-Press department can include add all the necessary finishing marks to your document artwork to ensure that it is print ready.
If you have any questions about print bleed or would like any advice about your print job, call us on +44 (0) 1761 409200 or leave us a message


Recent Comments